Sunday, December 9, 2018

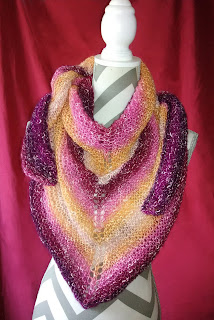
Our Lady Guadalupe Filet Shawl


I was asked to make a shawl using the same pattern as my friends grandmother made a wall hanging of 99 years ago.. this is what I came up with..


Our Lady Guadalupe Filet Shawl

This pattern can be used with any yarn and corresponding hook size, if you choose to use thread I would recommend doubling the thread to keep a wearable size. 
 
I used a worsted weight yarn and H / 5.00mm hook 
1200 yards of Yarn Bee's Rose Bud

 This pattern is written using American terms.

Ch 293


1 ) dc in fifth ch from hook, *ch1, skip 1, dc in next st, * repeat to end 145 mesh spaces


2 ) ch1, skip the first stitch at base of ch 1 just made, slip stitch into ch, slip stitch into dc ( counts as decrease at start of row ), ch 4, dc into next dc, *ch 1, dc into next dc* repeat to last mesh sp, do not work last mesh space ( counts as the decrease at the end of row )

Work four rows as row 2 before starting chart. 
Continue to decrease as established while working chart.


Stitch Key
ch = chain
dc = double crochet

Blocks
block = dc in ch 1 sp dc in dc
block over block + dc in each dc
mesh spaces = ch 1, skip ch sp dc in dc
mesh over block = ch 1, skip next dc, dc in dc


Tips

Places marker in center mesh space

Count...
each row.. each set of blocks...


PDF's for sale at 


Saturday, December 1, 2018

Etsy shop

LifeisGoodDesigns
Many new items being added.. be sure to check out all of the great gifts available for the loved ones .. don't forget that includes yourself ♥️

Now over 100 items and patterns.. taking custom orders for a limited number of products..
Hats, scarfs, shawls and more


I

Saturday, November 10, 2018

Crochet beaded button


I have many buttons I have either been gifted, came from thrift stores or pulled off of clothes before turning into a rags.. tins of them.. hundreds of not thousands.. many too beat up to put on a new item unless dressed up... There are of course many ways of dressing buttons up.. painting covering with cloth... but this is something  have been wanting to do for some time now..

 many of the items I make need a closure of some sort.. bags are on of my favorite things to make.. I have plans to make some one of a kind that involve all of the skills I have been honing for a while now.. free form crochet, sewing, weaving and beading....

I crocheted around the button tightly, the wrong side facing, using a smaller hook then the yarn called for. I then stitched the beads one by one in place on the top side until it was full..

I love the look, going to fit right into my plans... or become a pretty pin :)

Tuesday, October 16, 2018

Easy Twisted Headband

Easy Twisted Headband

This formula can be used with any weight yarn and corresponding hook size, as such no sizes are given as well as yardage or gauge.


The photo is showing Hometown USA by Lion Brand super bulky weight ( 6 ) using a L11/8.00mm hook
I have used single crochet, double and half double all with good success.


Written in American terms

Stitches
Ch = chain
hdc = half double crochet

1) Chain as many stitches needed to go around your head keeping it just a bit snug, chain one more for your turning chain


2) hdc in all chains.. you can use the bar or top loop I've done both but like the looks of going through the bar... turn


3) ch 1, hdc to end, turn


repeat row 3 as many times as you like to reach half the thickness you want


once you have half the thickness you want, fold in thirds with the live stitch in the center of the folds. Place a marker at that fold. See photo below


Hdc to the marker, count how many stitches you have undone, chain that many plus 1 for turning chain.

Turn, hdc into second ch, hdc to end of row
Repeat row 3 until you have the same thickness as the first half.


Fasten off leaving a tail about 12 inches long for seaming.

Seam edges to the beginning edge, making sure to “twist” them.. placing the top panel of the split side along the bottom part of the beginning edge and the bottom panel over the top panel. See photo.
Weave in ends.


Thursday, October 11, 2018

Hat sizing template


 I came across a post on Facebook tonight.. in a group for free hat patterns..
Printable hat templates.. in sizes from baby to adult... print them out, crochet you top circle to that size and stop increasing.. work to the bottom of the tube shaped piece and you got it... Check it out

 Get your free template by clicking on the link
Hat sizing template 


 Examples of the templates, not the full template itself 


Sunday, October 7, 2018

New Items free in States Shipping

Etsy

Free shipping in the US for a limited time on all items..
I will be adding more items as time allows, check back often .. here are a few of the new listing


 Luxurious Multicolored Scarf  
very comfy and soft


 Ponytail Holders 
many colors to choose from excepting special orders on these


 Prayer Shawl (pineapple ) charged with Reiki 
I place the best intent in each of my prayer/healing shawl


 Paw Print Scarf 
I love the way the yarn worked out just right for the "look" .. the different specks of color randomly throughout the scarf appear as if a little one was running over it, extra wide and long


 Prayer Shawl
Light and airy... feels so good


 Reiki Angels add a touch of reiki to any room


Larger Stress Relief Baby Doll       Palm Sized Stress Relief Baby Doll
  Charged with reiki

Monday, September 17, 2018

Cross Over Scarf


Cross-Over Stitch Scarf


size J/10-6.00mm hook
264 yards worsted weight shown in Red Heart's With Love Daffodil
8 by 64 inches
gauge not essential to this project
written in American terms

Notes
Worked flat, turn after each row until trim stitches. ch 3 at beginning of each row counts as 1 dc
scarf can be made wider by using a multiple of 4 + 4


Stitches
ch = chain
dc = double crochet
yo = yarn over hook

1) ch 18

2) dc 1 in third ch from hook, dc to end ( 16 dc's )

3
) ch 3, dc 1, *skip next st, dc 3, yo, with hook in front, insert hook from front to back into skipped st, loosely draw through a loop and bring it up to the height of the dc's, yo and draw through loops on hook * repeat to last 2 sts, dc 2

4)
ch 3, dc to end

Repeat rows 3 and 4 until desired length ending with row 3, do not fasten off.

Trim
ch 3 , working along the side dc to last space ( see photo for placement of dc's ), 3 dc in that space making first corner, work dc's along top to last stitch, 3 dc in that stitch for second corner, working along second side dc to the end space, dc 3 to make third corner, work dc's along bottom edge, slip stitch to ch 3, fasten off, weave in ends.


Saturday, September 15, 2018

Another Mindless Knit Shawl


Made with the shawl in the ball yarn by Lions Brand..  using size 8mm needles.. came out so nice the drape is perfect .. will be using more of this yarn


find pattern here

Wednesday, August 29, 2018

Tiny Owl or Kitty crochet pattern


So I'm playing with a small tapestry  weaving  (frame is 3 by 5 inches ) .. wanted to try a different leaf for a bullion rose ( crewel/embroidery ) quickest way to getting a piece of yarn work to try out new stitches that I have found .. so far  .. gives me some cute refrigerator magnets to sell to boot :) Had just a few years left of the soft green I was using.. hook sitting in front of me.. thought as long as I have the magnets out might as well make another small item...


I came up with an Owl.. these are going to be key chains but if you use thread and a smaller hook they would make cute earrings


  G/6-4.25mm hook 
couple of yards of worsted weight

written in American terms
ch = chain
dc = double crochet
hdc = half double crochet
sl st = slip stitch

1) ch 4 , join into ring with sl st in first ch
2) ch 1, working into ring hdc 10, ch 1, dc 1, ch 2, sl st into first ch, dc 2, ch 2, sl st into first ch, ch 1, join with first ch 1 of round. Weave in ends add eye of your choice I used tiny buttons ( see tip at bottom of pattern before placing eyes )

The more I looked at the more I thought it would make a cute kitty too.. so I made a second one

I followed the same as the owl until the last stitch.. I pulled it tight.. creating a "neck tilt" I also placed my button eye a bit lower and closer together
 and of course I added a tail

Tail
sl st to join yarn to body where you want the tail or use photo for placement, ch 6, sl st into second ch, sl st next ch, sl st three times into next ch, sl st next ch, sl st to body

         TIP = when seaming in ends weave though behind head area to give extra strength to hold eyes


UPDATE... I quick put together some earrings... once  again I need better photos lol
  used a 2.25mm hook with size 10 crochet tread 


Monday, August 6, 2018

Bulky cable knit hat pattern on the web


Things have been very busy.. I'll save details for the next post.. right now I like to share a fun, quick and free..  bulky cable knit hat pattern.. it's from  Lion brand yarns.
 Normally I don't pay a lot of attention to the patterns on the labels of yarn.. but normally I also don't buy bully yarn. ( Hometown USA in ST Paul Sky color way  ).. came across a nice deal .. thought it would make nice warm hats.. so I grabbed a couple with no real pattern in mind..

         Been working on a crochet fingerless glove pattern.. getting stopped too often to keep a train of thought going.. needed something I could pick up a million times and easily find my place.. reached for the closest yarn .. the photo on label looked like it fit the bill.. simple cable repeat...

I love it..
I did make a couple of changes, not really changing the overall look ..
I'm not a fan of the ssk stitch .. what's the point.. slipping then knitting.. just knit two together through the back loop.. quick and easy.. same slant.. so that switch was a must for me .. the only other change was to use the same stitch again for the last round of decreases instead of just knitting two together.. I wanted the slant to remain consistent through out.

I definitely will be making more .. the link is to the pattern on Raverly so you can see the other finished projects..


Cabled hat L32325

Wednesday, May 16, 2018

Weaving sticks

 Awhile back I came across some weaving sticks in an outlet store.. while they looked neat, I couldn't see parting with the $12.00 ... on clearance..
I walked away with some nicely priced beads and didn't give it another thought.. well sort of... after getting home I told hubby about them.. he said go back and get them...

 sure why not..... at least look again....
    after all it is right next to Joann's craft store, so at some point I would be right there ;) .. came home with a stunning rose quartz piece that was begging to come home... along with the beautiful Amethyst I couldn't set down..

Third trip some time after that....same out come.. the stones were still calling..

Went back one last time and yep you guessed it... still came home with more stones instead of stick's..
what can I say they really wanted to come home with me... and felt so nice...
     and were way less than the sticks to boot ... altogether ...
by then the sticks were sold out... after that trip so were the stones ;) .. they are all quite happy here


 Fast forward a few weeks... I am working on the tapestry loom my guys made for me to practice embroidery on yarn and or with yarn.. 
faster than knitting a pair of fingerless gloves with more space.. not as easy to mess up etc.....

btw those gloves are still in the works, my skills are getting closer to what I want,
however now is not glove weather, well maybe driving gloves.. steering wheel getting a tad warm these days..  oh wait that's another story........
                            anyhow they are on the back burner for now..

                at that point I recalled those sticks.. I needed to make a set.. why didn't I think of that ages ago lol

 I had been given a packet of these bamboo sticks along with some craft supplies years ago.. they looked useful but had no clue what to do with them..


They are smaller than the ones I had seen and much more to my liking in price lol... now to make a set..

The points are not needed.. these are just what I had on hand
6 inch dowel sticks work great ( or cut longer ones to size wanted, I found this size easy to hold on to )


 got my tools together ...
 
be mindful to place in secure holding before attempting to drill..
 
 safety glasses are a must also.. take my word on this.. oh and watch out for smoke.. no clue they could light up so fast...
the holes are 1/2 inch from the bottom of the sticks, I wanted a bit of length to help guide the weaving over the yarn that goes through the sticks..
 
 side note ... I have seen some sticks with little eyelet screws on the bottom but felt the possibility for the weaving to stick would rise, I'm sure they would work with some thought put into the works.. but I wanted mindlessly easy here.. something that could be done while chatting or walking along 


these are the finished product ... after a good sanding of course 


   After giving them a try I added a few more
 

And a few more..
 
These are so much fun, super easy..
 
to start to weave a length of yarn twice the length need, plus about 6-8 inches for tying off ( longer for fringe ), through each stick,
 you can put a loose knot at the end of each or tie them loosely together to keep things in place..
 put a slip knot around the first stick and start weaving up the sticks..
as they fill up side them down on to the yarn threaded through the sticks ( this is call your warp yarn )
 
be careful to keep a bit of weaving on the sticks to keep things looking smooth..
when you get to the size wanted slide all the weaving down even out among the warp yarn..  
 tie off.. you can weave the ends in or leave as fringe
 
 
I am going to use the pieces I made to hang earrings on at market.. come cooler weather I plan on making scarfs.. and such..
 

Saturday, April 14, 2018

Sashay yarn ponytail holders

 
I was gifted a rather large box of Red Heart Sashay Boutique yarn among many other brands of similar yarns.. I made a couple of scarfs with it..
while they claim to work up fast, that was not my experience
  it never failed that I would have to set it down and walk away.. pick them up and pull the stitches out .. ugh.. way too much effort for an item that wasn't selling anymore..
 
I got so tired of it I used many skeins as bulky yarn and crocheted it on an Q hook.. looks cool enough but takes a lot of yardage
I still had dozens of skeins left.. many just a single skein of each color.. not enough to make a bulky scarf or ruffled for that matter, some of the colors just didn't go together well enough to use on one item
 
I had seen how ponytail holders were being made from them.. but they were always finished off in my opinion.. rather sloppy..
Pulling the whole yarn through the last stitch and just leaving the end hang loose.. or tied in a big knot ..
both of which come undone with wear..
 
I just didn't like the look.. plus I dislike making anything that can't stand up to wear ..
truthfully one of the big reasons I dislike the ruffle scarfs patterns out there as well, if you pay for an handmade wearable item it should hold up for at least a washing..
I just don't like it..
 
I don't wear my hair up ever.. so the though of the ponytail holders passed pretty fast lol..
Until my sister came over wearing one.. with ends tied together.. making a pretty item look half done..
 
ok fine time to make a few..
if nothing else something to put on the table for market.. or a quick gift
 
I have sewn the ends of all of the ruffle scarfs I made in the past.. with the end kind of tucked under itself.. another reason they took me longer ;)  I'm telling ya I don't like loose ends LOL ..
 they still didn't look great to me..
 
with working in the round I hoped seaming them together would give it a more "finished" look
 
 
Sewing thread was too thin to do a good job..
crochet thread size 10 however works great..
 
I have many colors to match up with the Sashay yarn but not quite enough..
so embroidery floss for those.. ( 3 strains not the full 6 )
 
takes more time to sew them than to slip stitch around elastic band.. but worth the effort..


 I used about four yarns of Sashay yarn, size H8/5.00mm hook to slip stitch each..
some yarns looked better with less.. some more..
I just worked until they looked full..

 
Next I seamed the ends together.. after tying the end of the thread or floss I was using to seam with to the last slip stitch "live" loop .. I sewed a few stitches around that slip stitch just to be sure it wasn't coming undone..
 
 making sure to "capture' all of the loose ends ... I tucked them in a bit as I seamed.. making sure not to get too bulky
 
  I also trimmed of the longer edge of the Sashay yarn so it would sew up evenly.. and not hang lower


that was it.. nice and smooth.. no worries about hiding the knot under the ponytail .. not as fast as other methods I am sure but hopefully they hold up well... now to get someone to try them out and maybe even a photo with one in use


Wednesday, April 11, 2018

Dragon Scale Baby Booties Crochet pattern


                               Dragon Scale Baby Booties


I have been wanting to make a scale bootie pattern for ages now..
I finally put aside the time to do it.. newborn and 3 month sizes.. lots of photos.. written in American terms.. worsted weight yarn.
 

Now through April 30 2018 ( midnight mt time ) use coupon code BOOTIES to get pattern for only one dollar , be sure to add code before checking out as there are no refunds or returns.. only on my Raverly store
  click here