I am still planning on getting back to my scrap bag pattern but haven't settled which stitch to use for the strap, so that is yet to come .. in the meantime I am working on some cloth drawstring bags.
I ran out of the ribbon I use for the drawstrings, but had a dozen more already cut out... so....
While waiting for the next trip to town to get more, I added some embroidery to a couple of the bags using floss I had from cross stitch kits I did years ago, lots of different colors but typically not a lot of each one.. perfect for small projects.. and keeps with the theme of using scraps
Looking for some inspiration on Pinterest I came across a funky little bird image that I had also seen in an Etsy shop.
I was so tempted to get it from the shop, but was having issues with the download I already purchased...... a copy of a embroidery book dating back to the 1880's....
I couldn't open the PDF, turns out it was a link to a site to download it there, instead of the book. I didn't find this out until trying to download it on my phone hours later.. my PC just wouldn't open it
I tried contacting them but didn't get a reply for over 12 hours ( they are overseas from me ), when the seller replied, I was given another link to download it that my PC was cool with.. no more issues with it.. but this gave me the time to go looking on Pinterest in the first place
When I found the image of the funky bird on Pinterest it had a link to free internet archive site ( donations are welcome ).. link is at the bottom of this post... they are saving copies of books that would be lost for the most part..
I downloaded this book while waiting and a few others by Briggs & Co. this one is dated 1917... COOL
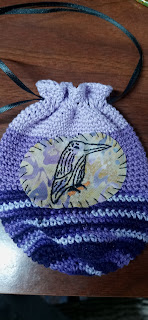
So in keeping with using scraps.. I grabbed a small piece of scrap fabric ( from the drawstring bags as it was on top of the pile lol ) and some scrap thread, the kind friendship bracelets are made of... in small hanks like embroidery floss but thick like crochet thread ... I had left over from market days ( made them to hand out to kids ) matched up pretty well...
the ribbon is some that was gifted to me, that was some of their scraps and is clearly well over 20 years old, seemed fitting ..
I used a B 2.25mm hook, standard increase of adding one extra stitch per repeat per round starting with six stitches in the round, until I reached 8 stitches in between increases,
then just continued with straight single crochet ( US terms ) until I reached a size I liked, working in a spiral ..
the ribbon is thin so I just did a round of double crochets after a slip stitch to even out the round..
topped it with a couple of rounds single crochets, used a yarn needle to weave the ribbon through...
with the color changes of the thread I used a simple knot, a few of inches from the end of the thread, leaving a good two inch tail of both threads,
I simply worked over both for a bit, keeping my tension on the tight side so it would blend in better.. snipped the ends off close to the stitch after a tug to pull smooth, giving me only the start and finishing tail to weave in..
I just did a simple stitch to attach the embroidered fabric to the bag after a rough round cut, keeping it wide spread and uneven.. no fussy cutting or interfacing..
I want a bit of fraying to happen as it ages .. the stitches are deep enough to keep it from affecting the embroidery .. oh I did use embroidery floss to stitch it down.. one strand was used throughout. used a back stitch for the inside feather lines and the outline wrapping the outline.. head I did a single wrap french knot..the eye, feet and branch were done with a satin stitch
as you can see from the photo taken off of Pinterest, I did change it up a little, a few less feather lines due to size and well because I don't normally like coping anything exactly .. even from pattern books.. got to put your own flare on your work
side note.. while I was getting a photo of this bag and the drawstring bags I embroidered, one of which I did a "sketch like" black bird ( see photo below ) .. this guy shows up right outside of my window sitting in the same pose..
this photo is before ribbon was added, did get some finally but as yet to take a photo
Link to embroidery book download


.png)
_(1).jpg)

.jpg)
.jpg)
.jpg)
.jpg)
.jpg)
.jpg)
.jpg)
.jpg)
.jpg)
.jpg)

.jpg)
.jpg)
.jpg)
.jpg)
.jpg)
.jpg)
.jpg)
.jpg)