Saturday, December 24, 2022

Brooch Grinch


I'm playing with beads again .. sort of... in between filling orders for a long tail talking caps, after crocheting for 10 to 14 hours a day, making brooches is just the break I need.. 
I've seen so many fun and beautiful ones on Pinterest, I just couldn't stop with the fabric ones I made around Halloween.

I'm definitely a fan of the Grinch so I decided to make me one.. 

The beading material is pellon 70 interfacing..

I drew the outline and facial features right on the interfacing using a pencil.

From there I did the outline of the hat, brim, pom pom and around the face with size 11 seed beads.. the eyes are also seed beads.. I wasn't completely thrilled with the coloring of the eyebrows so I added some black permanent marker on the dark green beads.. If I make another one I will change up the bead color of the eyebrows and nose but for a first try using my drawing skills, it came out better than I expected LOL

For the hat I use scraps of four ply yarn that I separated  down to two, so I could get it threaded on my embroidery needle and just satin stitched it down.. before stitching coloring the background with permanent red marker for more even look..
 
the white poofy part is made using brushed out yarn that is glued down with a bit of craft tacky glue.. 
I just took scraps of white yarn and used a cat hair brush I got from the dollar store to brush out the yarn until it was a poofy cotton candy like texture..

The "fur" is actually scrubby yarn by Red  Heart.. at first I was planning on using some spring green scraps I had from making a one of the stocking caps, when I glanced over and saw the scrubby yarn sitting out waiting for a different project.. it just seemed too perfect not to try

I stitched it down in place using nymo beading thread.. then trimmed it up some for a cleaner look.. definitely like the way it turned out. 

After stitching on the pin fixture and gluing felt on the back with a fair amount of mod podge to both seal and stiffen. I added size 11 black seed beads around the edge..
 I will update with more photos as time allows in the meantime I hope you all have a wonderful holiday season


Friday, November 4, 2022

Multimedia brooches

A few more of the pins I have been working on recently 
Started out by creating a sheet of fabric from scraps stitched onto a light weight interfacing
sewn on to denim... brushed out black yarn was lightly layered on topped with tulie netting covering... a cut sequin and metallic embroidery floss for the buckle and band, added a trim of beads after adding the felt backing and pin finding.. 


 The witch's boot was made using the same sheet of fabric made from scraps... denim, felt, beads and pin finding

The haunted Mansion started out with the same base fabrics, I added more embroidery to this one making a full moon, bats, windows, door .. added brushed yarn for a hazy night look, plus a bit of green for foliage.. also covered with tulie


The pumpkin is mixed colors of brushed out yarn to give it more depth.. trimmed  with gold cording, highlighted with an autumn palette of beads.

A couple of freeform ghosts  


This one's eyes can turn


Been wanting to do a few of these..


Wednesday, November 2, 2022

Alcohol ink cardstock displays

The homemade alcohol inks worked out great sprayed on with small clear bottles from the dollar store.
  Son carved some stamps from erasers.. also from the dollar store.. as well as the razor knife set he used LOL 
Hung the cardstock outside sprayed them with multiple colors, try it within a couple of minutes used the eraser stamps randomly over them...
 cut them in quarters, used a hole punch top center to hang from.. used a leather punch to make the holes for the back of the pins so they sat flush.
So much easier to display.. here I have them sitting on my phone stand.. yep from the dollar store lol 
 These pins had been waiting for awhile to have the machine touches put on them, after creating the pattern and doing the brick beading work I moved on to the next without deciding how I wanted to finish them off.. 


The last two are from freeform bead work over crochet bases.. 

All in all very happy with the results of the homemade alcohol ink. 


Saturday, September 24, 2022

Alcohol ink progress

 I added to a couple of the colors.. a pack of markers from the dollar tree.. so definitely not high end .. 

Had two colors i didn't already start so they got added to colors already in the works.. 

Added the orange to the yellow .. as it was pretty weak looking.. 

Purple went in to the brown..  


This is less than a full day later..

Tried a couple of colors out on some plastic beads.. the bottom beads are what I started with.. 
The center is the original color in this photo.. I am very happy with the results so far.. 


Friday, September 23, 2022

Homemade alcohol ink

Giving alcohol ink a try ... Saw a few posts about using it to spruce up buttons and beads.. 
Went to buy some but they didn't have the colors I was wanting.. 
After checking on YouTube and realizing it was doable at home..  

Old marker innards and isopropyl alcohol 91% in glass jars

 Only been a few minutes... 
Looking pretty good so far .. 


Going to let them set overnight.. 


Monday, September 12, 2022

Reusing Ribbon

Just finished a batch of cloth scrubbers for an up coming event.. 
Want to add easy to see labels for both pricing and item description 


Playing with different ideas on wrappers and such ... When I thought of how much I like the look of the simple tied ribbon like on these fat quarter packs .. I like the ribbons so much I have been saving them for awhile now lol 


   they are really nice just need

a  quick iron .. on low .. just a couple of seconds later.. 
and they are ready to use 


Now I just need to print up a tag or two  


Saturday, June 25, 2022

Ugly test glasses case


More than a year ago, I was trying a stitch I came across .. Planning on a cowl.. 

by the time I got a few inches in I was more than over wanting to try any further rows.. it did make a nice dense fabric 
I have issues "wasting" anything or frogging if I can turn it into something else..

.... a pair of reading glasses were sitting there ...
So ugly test glasses case was created


 Been playing with the idea of making eye glass cases for awhile.  How would a crochet one hold up, would it protect the glasses enough to be useful... I get mine from the dollar store so it's not a big expense if it doesn't work.. 

Test results ... 
they were definitely easier to find in bag... the crochet held up well... and did keep some damage from happening... but let some dust and sand in. 

 I have been keeping it in my ugly freeform test bag... that's a whole nother story lol quick take away.. very hard on bag and everything I put in it or attache to it ... been great for seeing how well things hold up..
The case needed to go to"next level" testing.. 
I want to see how well some embellishments would hold up .. ribbon, fabric and acrylic beads.. specifically on a crochet item in heavy use.. 

Got out a few pieces of scrap fabric for liner and yo yos .. 

  
Should help with the dust and sand issues


Quickly found out a template is worth making


Went to my scrap ribbons next


I save ribbons from fat quarter packs and such... these are just long enough to make a small "woven" rose and over stitch line

This piece actually has writing printed on it from the manufacturers of the item it came on.. after making it into roses you can't tell... 


Tried a few different techniques in both creating them and stitching down... added the acrylic beads to the centers.. 

I decided to fill in the whole thing.. how well does a yarn applique hold up being carried inside of a purse or bag.. how about lace flowers.. 

This is definitely a one of a kind item LOL 


The added thickness will definitely add protection .. the textures are a definite plus to easy finding in a large bag lol


Let the testing begin 


Wednesday, June 15, 2022

Fabric Bowl update

Late last year I made a fabric bowl cozy thinking my dog could use it as a soft sided kibble bowl...  he loves it.. so much so I made him another lol...
I decided to thoroughly test these before considering them for a new item in my shop.. they will be sold as bowl cozies not dog food bowls but the thinking is if they hold up to being a doggie dish they should be a decent cozy right
 
these are the original photos, taken before washing     


These photos are after almost six months of daily use.. washed and dried without any special treatment .. cold water and medium heat.. with anything from towels to jeans..


They did shrink a small amount, not enough to need to resize the pattern .. the cotton batting fluffed up a bit but held its placement well.. they did fade some but fabric still holding strong.. I didn't use any fabric softener  even though we have very harsh water.. laundry soap is not what one would consider high end... so no added fabric protection .. all in all I'm very happy with the test run.. now with a sturdy sewing table/desk I plan on moving forward with these and a few other items I've been testing.. no set date yet so stay tuned ;)

Tuesday, June 14, 2022

New Old Desk


Found a great deal on an old office desk.. large enough to use as a sewing table and super sturdy .. metal sides and drawers with easily an inch thick top .. had to grab the van to get it home .. 107 degrees in town no AC in van .. even though the van is extra long we still needed to remove both rows of seats 


An almost complete rearrangement was necessary to one room .. well worth the effort.. had been planning on changing a few things around any how so worked out wonderfully .. definitely happy with this thrift store find .. now to add those liners to the crochet bags 


Saturday, April 9, 2022

LIGHTS

One of my biggest issues with everything online has been the ability to get decent photos

When I started writing knit patterns I had issues with battery eating cameras and funky flashes...
Since those days I have improved the camera but now use my phone more lol

Lighting has become my biggest problem.. use natural light they all say.. 
Not when you live in a desert that has very bright sunshiny days to the point of washing out the photos along with pretty regular winds.. 50 mph winds are fairly common.. more so if I dare take out a yarn item for phones.. 
I end up with washed out colors of blurriness... dozens and dozens of photos to get one or two ..
With the indoor lighting even if bright,  always full of shadows  

Wanted to try selfie lights but price and space were an issue.. didn't have an area to set up in big enough.. and didn't want to pay a high price on something I wasn't sure would work for yarn and beads items..
As more folks stopped working remotely I came across a pretty good sale, worth the risk .. got a couple
 but still didn't have the space set up

Finally my long awaited photo area is happening.. I am so thrilled .. 
Still needs work .. changes will happen as I see what works.. happy dance time 


 Playing around with my cell phone trying different settings... just to see ..  using a bag I just made for my aunt..  she needs one that will hang around her neck for her cell and a few other items.. keeping her hands free to use her wheel chair so I thought I would take a few shots showing it's features....  I have been doing applique work so added a few.. 
Medium light ..  I just love pansies, I think of them as elegant flowers but also wanted cheery so added some forget-me-nots lol .. not quite enough light to see the details.. 


Switched to a more blue brighter light... you can see the butterfly on the flap really well... nice detail 

Side note.. the butterfly pattern popped up on my YouTube feed .. had to stop everything and give it a go .. quick and fun  .. just look up butterfly applique..

Happy with the stitch visibility .. colors are accurate.. I flat out LOVE that 

Two pockets were requested so I tried taking an inside the bag shot.. this is going to need a better setup.. prop of some kind... however you can see both pockets so counting this as a win 

I added a snap on one side of the strap.. for ease of putting on ones neck ..  wrapping around the handle of a wheelchair or walker.. safety issues.. the snap shows up really well in this shot.. nice 

This one is without the lights on.. a bright shop light .. bright enough to do detailed work with but not a decent photo .. this one actually took longer to set up than any of the others and would have been one of the better ones .. many of my items in my Etsy shop have the same kind of shadows ugh.. my shop so needs an update... soon .. 

So far with just taking less than a dozen shots I can see such a big difference.. with so little effort.. 
This is going to be fun 


Sunday, March 20, 2022

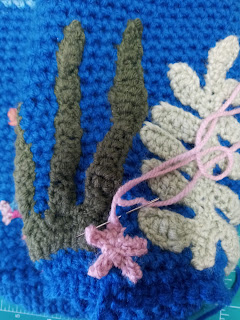
Sea Bags

Working on items to restock for next winter for weeks and weeks now... need a change of pace ... decided to do something fun..

I have been gearing up to make bags have ideas for so many it was hard to pick where to start lol.. with my sewing area under works i was able to narrow it down a bit.. 
got a few base bags done and now adding to them..


                             picked up some patterns to start me off on applique work from  Raverly, Etsy and YouTube  ... didn't take long to decide to switch to free form.. got a few really good tips along the way so worth the price and time


I picked up a few cutting mats from the Dollar Tree awhile back for my cutting table.. tapped them together.. works great and was able to fit it to my table.. planning on adding a few more as things move on with my sewing area.. in the mean time I am using one slid into the bag to make seaming down so much easier..